Lacemittens „Hilda“
by Kristi Everst
https://undiinblog.wordpress.com/
My name is Kristi and i live in a small country with a rough climate –Estonia. I believe that the weather here is made for knitting and that there’s nothing better than sitting with a hot cup of tea, clews and knitting needles in front of a warm fireplace and listen to the raving snow storm outside.
I started to knit when i was a little girl. Little happy girl, because i had a two wonderful women in my life – my grandmother and her sister. They were very different women, but both talented knitters and it was a joy to sit with them, listen their storys and learn to knit. So, it is obvious that i named my first pattern according my grandaunt Hilda.


Heirloom of our family – woolen Haapsalu scarf, knitted by my grandaunt Hilda (in the right photo).


Hilda mittens – knitted by me (natural white rove, natural white + handdyed wool).
You may use this as a free pattern (for makeing mittens for yourself and as a present, please do not use to knit mittens for sale), but i will be really thankful if you make a little donation to cancer foundation in Estonia: http://kingitudelu.ee/for-benefactors
Beneficiary: SA Hille Tänavsuu Vähiravifond Kingitud Elu
Bank 1: Swedbank
Address: Liivalaia 8, 15040 Tallinn
IBAN: EE212200221059073061
SWIFT/BIC: HABAEE2X
PATTERN:
First of all – those mittens seem do be difficult to knit, but be brave – it is not so difficult at all. You just need to knit instead of 2 mittens 4 mittens.
Material:
For basic mittens you need 100% wool rove + 100% wool 8/2 yarn (I love to use natural colors – lambsbrown, -gray, -white or handdyed yarns).
For lace mittens you need 100% wool 8/2 yarn. (I prefer to use natural white or any other lighter color as the basic mittens yarn – then the result is romantic and gentle).
Needles: size 4 mm (US No 6) for basic mittens, size 5 mm for lace mittens.


In the left photo you see the 100% natural lambsgray rove and 8/2 wool i used to knit my basic mittens in the right photo.
Knitting the basic mittens:
Wrist (cuff):
Worked in the round on double pointed needles. Cast on 40 sts on double pointed needles size 4 mm / US 6 with two yarns rove + 100% wool yarn (10 sts in every needle).
Knit:
1 round K 40, 2 round P 40 (continiue to work same way 5 times).
13 round: slip 1 st as if to K, K 1, K 8 (continiue same in every needle). Now you have 9 sts in every needle (36 sts).
14 round P 36, 15 round K 36 (continue to work same way 5 times).
26 round: slip 1 st as if to K, K 1, K 7 (continiue same in every needle). Now you have 8 sts in every needle (32 sts).
27 round: P 32, 28 round K 32 (continue to work same way 8 times).
Now is the wrist ready. If you want you may now change yarns and use different kind of color (but be sure that this is 100% wool).


For excample: Those mittens on the left i knitted this way that wrist is knitted by using rove + dark lilac yarn and after the wrist i changed the lilac to natural white (with same yarn i knitted the lace).
If you continiue knitting with the same color you knitted cuff, then the result will be something like in those mittens on the right picture (basic mittens behinde the lace are yellow). If you want lace to be distinguishable, then i reccomend to continue knitting with same color as the wrist.
If you want really warm mittens, then you may also knit with 2 rove + woolen yarn.
KNIT (left mitten):
4 rounds K 32
On the 5-th round start to knit thumb gusset. The thumb gusset is in the end of the 2-needle (left mitten) and in the beggining of the 3-needle (right mitten).
5 round: 1-st needle K 8, 2-needle K 5, increase one twisted sts , K 2, increase one twisted sts K 1, 3-needle K 8, 4-needle K 8.
6-7 round: K 34
8 round: 1-st needle K 8, 2-needle K 5, increase one twisted sts, K 4, increase one twisted sts, K 1, 3-needle K 8, 4-needle K 8.
9-10 round: K 36
11 round: 1-st needle K 8, 2-needle K 5, increase one twisted sts, K 6, increase one twisted sts, K 1, 3-needle K 8, 4-needle K 8.
Now you have all 8 sts you need for thumb gusset. Continiue knittig stockinette sts until you reach to thumb gusset. To find the right height try how it suits to your hand.
How to knit thumb gusset:
1 round: 1-needle: K 8, 2-needle K 5, slip the 8 thumb sts on one stitch holder, pick up 4 new sts behind the thumb gusset, K 1 (now you have 10 sts on the 2-needle), 3-needle K 8, 4-needle K 8.
2 round: 1-needle: K 8, 2-needle K 4, slip 1 st as if to K, K 1, K 2, K 2 tog (now you have 8 sts on the 2-needle), 3-needle: K 8, 4-needle K 8.
Continiue with stockinette stitch, until you reach the end of the index finger.
Deacreasing:
If you reached to the end of the index finger start to deacrese your basic mitten.
Decrease in every round:
1-needle: slip 1 st asi f to K, K 1, other sts on the needle K
2-needle: all sts exept two last K, two last sts K 2 tog.
3-needle: slip 1 st asi f to K, K 1, other sts on the needle K
4-needle: all sts exept two last K, two last sts K 2 tog.
Continiue knitting same way until you have one sts in every needle. Then cut the yarn, pull through the loop and fasten.
How to knit thumb:
Slip the 8 thumb sts back to double pointed needles size 4 mm / US 6. Pick up 4 sts behind thumb gusset = 12 sts.
(I like to pick up one extra sts between the 8 thumb sts and 4 sts picked up behind the thumb – it makes then 2 extra sts = 14 sts. I also like to knit thumbs with four needles unstead 5 needles).
Work in stockinette stich in the round for approximatley 6 cm. Then start deacreasing in the beggining of every needle: slip 1 st asi f to K, K 1, other sts on the needle K. Continiue same way until you have one sts in every needle. Then cut the yarn, pull through the loop and fasten.
Now is the basic mitten ready and we can start with lace.
How to knit lace covering:
Yarn: 100% 8/2 wool
Needles: 5 mm
I prefer to knit lace covering with 4 needles instead of 5 needles. It is little bit difficult, but the result is much more beautiful.
Knit (left lacemitten):

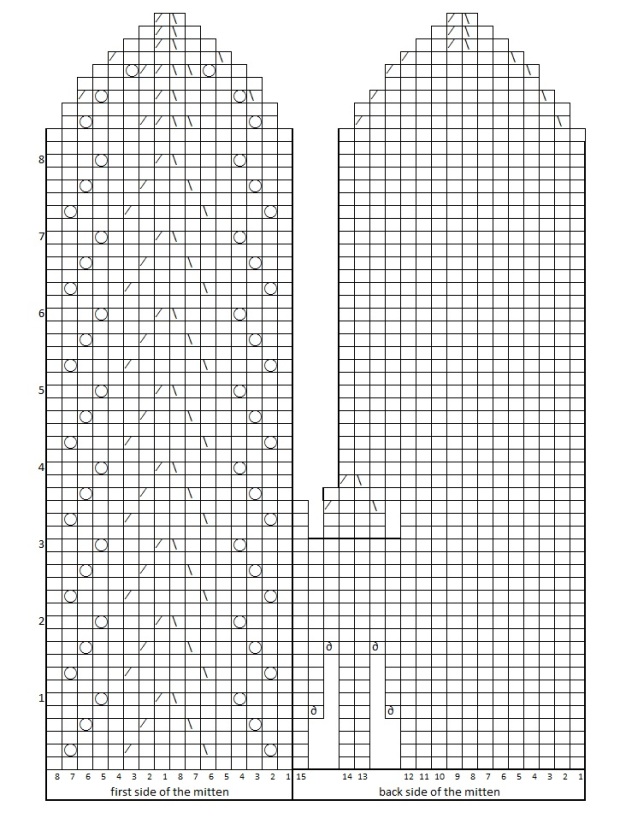
Pick up 16 stiches with lace yarn in the first side of the mitten on two needls (8+8) and 15 stiches in the back side of the mitten on one needle.
Divide sts on the needles in this way (if you knit with 4 needles):
1-needle: 15 sts (if you decide to knit with 5 needles, divide those sts to two needles 8 to one, 7 to another)
2-needle: 8 sts
3-needle: 7 sts
Start to knit with lace yarn according to chart:
Enjoy your warm mittens in winterdays!


Thank you so much for the fabulous pattern. I will definitely be making a pair of these.
Thank you, Su! It´s so fabulous that “my mittens” can now welkome winter in so many different plases 🙂 It really is such a suprice to me, that so many knitters love them.
Thank you so much for this pattern. I have admired your mittens and will be very happy to make them. I spent a year living and teaching in Estonia, and absolutely fell in love with your country. I still dream of returning.
Thank you, Tina! Im so glad to hear you love our contry, i could´nt live anywere else.
This is the most beautiful, warm mitten pattern I have ever run across. I’ve tried to come close in duplicating the top layer, so can’t tell you how absolutely THRILLED I am to see the pattern now being offered. I can’t wait to make a pair of ‘the real thing”–and I already know the first pair will be just for me!!
Thank you so much, Chris!
Thank you so much for sharing your wonderful pattern. I have always wanted to make one ever since I saw these mittens. And its free too!
Thank you, Cathy! Yes, it´s free. It looks like i´m not gonna be rich with receiving money for pattern, but i think i´m have alredy getting much more! Your lovely comments are better than any money can never be.
Thank you so much Kristi for this wonderful pattern. I really really love them, they are stunning! I will make some for sure. You are making me very happy! (Josee from Canada, ravelry = Tricothon)
Thank you, Josee 🙂
Lovely idea ! And such a beautiful story behind it !
I’m not sure I understand what happens on the lace chart at the end of the thumb gusset ? Are stitches bound of ? Put on a holder to pickup and do the thumb like the inside part ? Then why are there decreases ?
Hi, the lace mitten thumb is knitted same way as basic mitten thumb. First you increse before thumb 2*2 extra sts and after thumb gusset you have to decrease them.
What beautiful mittens and such a wonderful story. Thank you for sharing them.
I am so excited to make transmitters ! What is the gauge of the yarn, is it equal to a worsted weight ?
Such a sweet story and one of my favorite mitten patterns! Thank you and I will soon be making these for my beautiful granddaughters!
I have loved your mitten for so long, I am so excited to make a pair for myself. Thank you so so much for sharing. I also have a question on the yarn. Are you using a worsted weight for both yarns?
Thank you so very much for the free pattern!!! I have loved these beautiful mittens since seeing them on Pinterest a while ago. I will spend part of my birthday knitting these. Thanks again!
Thank you 🙂
Hi your pattern is so lovely!! What is you gauge for the basic mittens and the lace mittens?! And I just want to make sure I did understand right, you use 2 strings of rove wool and one string of the 8/2 wool at the same time to do the basic mittens?! Thank you very much!
Hi, for the basic mitten i use one string (or 2 if you need very warm mittens) of rove wool and one of the 8/2 wool at the same time.
Thank you very much! Do you have an idea of your gauge?
Hi Valerie. Do you mean, that how much yarn i needed for knitting? If yes, than actually i do´nt know, i just live inside yarn 🙂 But not much, as the needles you have to use for knitting are quite thick.
I mean how many stitches and rows in a 4″x4″ square 😊
No podría recivir tus trabajos en Castellano? Un saludo.
Is ‘one string of the 8/2 wool’ the same as lace weight?
yes
These are gorgeous! Thank you for sharing! 💟💕💟💕
Gorgeous!!!! Thank you so much!!!
Beautiful going to give these a try soon. Will keep u posted
These are amazing, thaknk you for sharing
Reblogged this on Welcome to Knitting in France and commented:
I just came across this blog while browsing Pinterest. I love the mittens here and since it is a free pattern I just had to share. These would be perfect knit up in Icelandic unspun roving and them some gorgeous thin yarn maybe Einband which is also Icelandic.
Plus this is the blog of an ESTINIAN knitter and we all know how beautiful Estonian hand knits are so I think you might enjoy reading this blog.
Thank you!
You are more than welcome! I’m so happy I discovered your blog and so are my readers:)
kristi, can you tell me what the symbol means in row 5 on the back side of the mitten chart, right before rows 13 and 14, and right after rows 13 and 14? thanks so much! i adore these mittens! xx
Hi, it means – increase one extra stich. It is important to the thumb to be more comfortable to wear. But actually it isn´t nessesary to knit in this way, i just like the thumbs with increased stiches more. But if you are used to not increase stiches to thumb, you may knit basic mittens in this way also.
thank you so much for your response! i look forward to making a beautiful pair! xx
Absolutely beautiful! Thank you!
Thank you very much for this beautiful pattern. They are going to be great when the norwegian winter is upon us:)
Thank you! I assume that norwegian winter is very similar to estonian winter. So dreamy and beautiful and ingredibly cold 🙂
These mittens are stunning! I love them and will have to knit some!! I also really enjoyed your blog post! Thank you so much for sharing! Best,
~Sarah
Thank you, Sarah!
Thank you so much for the free pattern. And, thank you for sharing your talent, what a gift that is!
Thank you so much for pattern. And, thank you for sharing your talent with us, a gift to us all!
If I wanted to knit the cuff part with just a single yarn, what weight would work?
Hi, you have to then just try wich yarn combination you like.
These are so beautiful and to my eyes very original. I m hoping to make these . Thank you for the pattern. Greeting from the prairies in Canada (screaming hot in summer and brutally cold in winter.
I’m new at knitting !
What does the K and P stand for? 😄
K – knit, P – purl
Thanks, i have one more question, in the lace pattern there is 4 symbols, that looks like a no. 6 turned the wrong way, what does that mean ?
I figure the O = yo, \ = SSK, / = k2tog, and the blank space is just a regular knit 🙂
Yes
Beautiful design. I will have to add this to my list of projects.
Beautiful!! Thank you for sharing your pattern and lovely family history! I’m going to make these for winter in Alaska. I may try making a hat too
Kristi, thank you so much for this pattern! I couldn’t wait to start it, will be a perfect gift for my close friend. I am stuck and I’ve tried to figure out the pattern for the last couple days until i’m left with no other option then to probably ask you a silly question. After the cuff (5 round)it says to increase one twisted stitch. I think I figured out what a twisted stitch is but you still have only 32 stitches for that row not allowing for the “increase one twisted sts” I don’t know what I’m doing wrong!! I would appreciate any help you would offer.
Dear Jen
.
Thank you!
After the cuff – in 1-4 round you have on needles 8+8+15=31 stc, on 5th round you increase for thumb 2 stiches – now you have on lace side still 8+8 stc and on one needle 15+2 stc. Then you knit 4 rounds with 15+2 stch and increase again in thumb side 2 stiches – now you have 15+2+2 stiches and you will continiue with those to the thumb cusset. After the thumb cusset you have to decrease twice those 2 and 2 stiches you were increased before and after that you have again 8+8+15 stch on needles.
Beautiful pattern and great idea, can’t wait to start them and will do some as Christmas gifts. Thank you
Stunning. Just beautiful.
I find this just in time to make a pair for Christmas gift 💚 thank you so much for sharing your work . Have a wonderful Christmas season.
Linda
Thank you, Linda! Im so glad that you will make my mittens for christmas 🙂 ams
Hello Kristi, thank you for the beautiful pattern! I just have one question: After the wrist the row consists of 32 sts. Then you increase in round 5, so you have 2 extra sts. How can it be in 6-7 round K32 then? Wouldn’t it be K34? And afterwards again: + 2 sts = K36, + 2sts = K38? Sorry I don’t get that part, but would love to complete them 🙂 Best, Natascha
Hi Natascha, you are right, my mistake. Thanks! Of course if you increase 2 stc-s you have 2 more in the needles. Corrected now in the pattern.
Ah ok, thank you very much! It’s so nice that you shared this! Best wishes to Estonia!
Thank you for posting this pattern. I have been looking for something like this for a while now.
I am just about to start the lace layer…… but
What is that symbol that looks like a backwards 6??
Thanks! Love the fit of tgese mittens:-)
increase a new sts
Hi, might be silly but could you please put up a key (explanation) for all the symbols in the chart? I love these and can’t seem to find one.
I managed to make a set for. Young lady that will be getting married later this winter. Part of the pattern that needed some changes was the slip 1 as to knit and then knit one, the pattern didn’t say to pass the slip stitch off.
thank you so much for this pattern! My mama loves mittens and I am knitting her a pair up for her birthday! she will love them so! thank you thank you